Sunday 23 December 2012

Hobby Stuff: Shipping Containers


I have been accumulating these shipping containers from Tablescape in dribs and drabs, steadily gathering more and more. I have at last count around 18, which should do for a credible container yard or docks set-up I hope (click on pictures to enlarge).

The latest batch are the rust red colour (top picture) and were painted that colour on request (the usual packs come in 3's with one of each colour of grey, blue and green). Tablescape are happy to listen to customer requests on having their stuff in different colours and cost depends on whether they have that colour in stock or not. Since they had a suitable colour, there was no extra cost for the 6 I bought.

The purple containers (a set of 3) were re-painted by myself. It did take a few coats to over-paint the original colour, so I will look to discuss custom colours with Tablescape if I want more in non-standard colours.

Saturday 8 December 2012

Gallows

Click to make bigger-er
I built this a while back, but only recently added the 'rope' which still needs to be tied off some-how.

The kit is from Battle-flag (link) and is BW4 Hang 'Em High Gallows.

The rope supplied with the kit looked too thin for my liking, so I replaced it with a suitable alternative from Gale Force 9; that came in a black colour so had to be painted a suitable colour as an alternative.

The kit comes with a base, which I was not satisfied about, so I assembled it without base (as carefully as possible, using dry fit to the base as a guide), and then snipped off the tabs to fit to the base.

The painting was my quick washing technique from the other Old West buildings (using really thinned down Vallejo paints).

Wednesday 14 November 2012

Lady Panther (Super November 2012 #2)

This is the second mini in the challenge, and Rob and I have agreed to get as many supers minis painted in one month a we can, after the relative success of Zomtober.

So after last week's Harrier (seen on Pulp Citizen here) this week I have painted the Lady Tiger mini from Reaper's Chronoscope range.

I make no bones that the colour scheme is stolen off a certain Marvel-lous cat-themed super; if it works why not?

After last months Zeds got my painting rustiness out of the way, it has been nice getting more diverse pieces painted, and diversity is definitely a key point with this month's challenge.

This mini may never even see gaming - who knows - but it was nice to paint and nice to have it finished. Lady Panther's back-story has her as an Unhuman adventurer-thief with cat-like powers,who keeps making bad decisions, such as throwing in  with the Crimemasters from time to time!

Keep watching here and Pulp Citizen to see how I get on!

Saturday 3 November 2012

Batman Miniature Game

Oh Knight Models, take my money now. Really, I will check down the sofa straightaway.

The words Batman Miniatures Game (or will it be Arkham City?) and expectations of Knight Models based on the quality of their other sculpts means I am sold sight-unseen on this new game and its minis.

After seeing some of the previews I am definitely in. This ticks so many boxes for me. Great IP, great (presumed) quality, and the option to use terrain I have already.

I have serious doubts about the game simply based on the fact that this is Knight Models first foray into gaming, and I thought I heard a rumour at salute about a Star Wars game from them; so is this a re-purposed system? Who knows. Well the Star Wars license has gone and this could be brilliant  Or it could be some decent minis and a terrible game, I don't care - they got me at Batman Miniatures Game, even if the prices are sky-high.

This won't replace Pulp City as my favourite, simply because I feel so invested and immersed in the game and its continuance, but as a side-line? Well that is another story.

So excited am I about this, that I shelled out for the 35mm Batman mini KM do, not even knowing if it will scale with the upcoming releases!

Oh Knight Models, get those minis and that game out now, please!


Thursday 1 November 2012

Super...Something-or-other Month!


Okay, after the relative success of Zomtober, and with Rob mentioning he felt that he was behind in painting 'supers' minis, and with me knowing I have been remiss in painting through the year, we have settled on SupersNovember. Or Supervember, Or whatever we will call it (I favour Supervemeber right now, or maybe Newsupersvemeber, who knows...).

Anyhoo, the plan is to paint one 'supers' themed mini per week through the month. To that end I have picked out three Pulp City minis (one of which will be for Hendybadger's Paint the City Pink initiative), and one Chronoscope super. So most will be posted on the Pulp Citizen and one will be posted here, if I hit my targets. The minis I plan to do are in the picture, but plans often change don't they?

So each week, ending the 7th, 14th, 21st and 28th we aim to each finish at least one 'supers' themed mini. yes some have a little work on them done already, but we  agreed that as part of the Zomtober ground rules so it apples here too.

Wish me luck and stop by the Pulp Citizen and/or here for progress updates!

Wednesday 31 October 2012

Zomtober Zombie (Week 4)

The final Zed - another Big Boss  Zombie, and another ugly one!

This could have been finished at the weekend, except for my sojourn with Rob to some VBCW gaming in Evesham (read about here on Rob's blog).

So the last bits and bobs of painting were completed over the past two nights.

In all I hit the minimum target which is pleasing. Considering I had painted so little in the last few months I suppose I should be satisfied with doing even just 5 minis.

This Boss Zombie is from the same pack as the last one and is by Studio Miniatures. Base as usual is by Fenris Games to tie my horde together.

A nasty looking piece of work this one, I wanted the 'cracked skin' on the hands to have the hint of red-raw muscle underneath.

So Zomtober ends, and my horde (ha-ha - a genrous definition if ever there was one) has grown by 5. Well done to all who participated. There will be next year I reckon...

Sunday 21 October 2012

Zomtober Zombie (Week 3)

Okay, my offering for Week 3, and the fourth of the target minimum of five. A big Zombie (or a boss as I like to think of the Zeds I mount on 40 mm bases).

That means my current 'horde' stands at 19 minis, and if I hit the Zomtober target it will mean a twenty five per cent increase since last year.

I love the irony of this mini - a fat Zed in sweats!

I feel my painting rustiness has subsided, so this is probably the most satisfying of the minis painted so far this month, and the nice big surfaces probably helped in that. The skin toe is my usual Zed-recipe of Vallejo Green-Grey base, with highlights of a Green-Grey plus Basic Skin Tone mix at 2:1, 1:1, and finally 1:2 ratios, with some very thin Devlan Mud as a wash.

The mini is a from a pack by Studio Miniatures, with the usual (for me) base choice from Fenris Games.

I have some more Zombies in various stages of completion, so I think I should hit the Zomtober target; just one more to go to hit the target, anything else is a bonus. Rob, inevitably, has painted about twice as many as I have!

Wednesday 17 October 2012

Zomtober Blog-Roll (Reminder)

Zomtober rolls onward. Don't forget these other fine blogs engaging in the Zomtober madness.


The Zomtober Blog-roll

Four Colour Super Minis

Brummie's Wargaming Blog

Miniatures, Painting and Hobbies

If you want to add your blog to the list, just comment - it is never too late for Zombies!

Sunday 14 October 2012

Zomtober Zombies (Week 2)

Okay two more done, not brilliant by any means, but done. I consider these to be my Week 2 and Bonus Zombies, meaning I just need to complete a minimum of one per week for the next two weeks to stay on track.

The Zombie on the right is Hasslefree (sculpted by Matt Lord rather tan Kev White); I am clueless as to the origin of the other one.

I think I now the problems I had with these, and I think it relates to by current 'black' technique and the drapery on these minis. I was not overly impressed with the way the drapery has been sculpted, and consequently I struggled with painting it, it probably does not suit the technique I tried. They should be fine amid the horde however, so no great problem. Bases are the usual Fenris.

The bottom picture shows these Zeds with the first one as a group of three. Most of my Zombies have been painted in groups of three so far, each tied together by a colour theme.

Wednesday 10 October 2012

Stone Men Of Resurrection Island

The Stone men Of Resurrection Island
Remember these from a few posts ago? Here they are with Mysterious Man (from Pulp City) for scale.

Well they were sprayed grey, had a few different shades of grey daubed on top, then a couple of lighter greys dry-brushed over that. Simples.

Add a couple of washes (Secret Weapon Black-Green wash thinned with water and and Army Painter Dark Tone again thinned down heavily).

Not the most amazing painting ever, but they are now as I want them.

Sunday 7 October 2012

Zomtober Zombie (Week 1)


Phew, just made it!

Readers may recall that Rob threw down a challenge to paint five Zombies this month (which we renamed Zomtober in deference to the undertaking), and today I have been busily working on three, of which this is the first completed. the others are not quite done, but they get me 'ahead' as it were for next week and maybe the week after.


This Zombie is from Studio Miniatures. My painting is certainly a bit rusty since I have been so out of practice, but at least I hit the first deadline. The base is Fenris Games which I tend to use for most of my Zeds.

Rob has already completed two Zeds, but he paints faster than me so that is to be expected.

Onwards then with Zomtober, and if you want to join in please comment and label your own blog posts/threads Zomtober and I will give you a plug on the Eclectic Gentleman Tabletop Gamer.

Wednesday 3 October 2012

Paint the City Pink


Click image for link
I mentioned this fund-raiser on Pulp Citizen, but it is well worth highlighting again.

Hendybadger (of Tales of a Tabletop Skirmisher) has launched a fund-raising project in aid of Cancer Research UK.

The premise is simple and details can be found in the Tales of a Tabletop Skirmisher post here.

More and more prizes have been added to the mix from all sorts of great manufacturers.

Hendybadger wants as many participants as possible as there are tons of prizes available (see this post here); so grab a mini, paint it pink and enter into this great fund-raiser.

Some Scenery Bits From The Pet Shop

The statues of Resurrection Island?
I picked these up in a buy two get the (cheapest) third free offer at Pets At Home. The three items came to less than £9 GBP, and are items for aquariums/aquaria.

They come with a couple of holes (for retail tags to feed through) which needed filling and so since they have needed a little green-stuffing, I will be repainting them. They are pictured with June Summers (Pulp City) to show scale.

The Easter Island heads (maybe Resurrection Island could be a 'location' in the southeastern Pacific Ocean?) will be painted a basic stone grey. I can see these used on Kodo Island (Pulp City), as well as for Pulp or Victoriana gaming, or maybe even sci-fi on some back-water planet.

Unusual rock formation
The rock formation interested me for the cover possibilities& with the aperture. That will be painted to match the Ziterdes Modular Gaming Table boards I picked up a couple of months ago. It will not be staying that colour, trust me!

Expect more pictures when they are painted.

Monday 1 October 2012

Zomtober Blog-roll (It Has Begun!)

Not only has me mate Rob, the brains (...brains, brain...) behind Zomtober started us both off, but Brummie has decided to join in, as has Adam.

Therefore until the end of the Zomtober period I will post an updated Blog-roll for Zomtober participants.

Send more Zombies...

The Zomtober Blog-roll

Four Colour Super Minis

Brummie's Wargaming Blog

Miniatures, Painting and Hobbies

Sunday 30 September 2012

Zomtober!

The target minis for Zomtober
Okay, being ever the sporadic painter and modeler  I have been challenged by my main gaming buddy Rob to get some stuff done.

To that end Rob has thrown down the Zomtober gauntlet: to paint at least one Zombie mini per week during October, and one bonus mini for a minimum of five in total. We have set each Sunday as the deadline for one mini per week (7th, 14th, 21st and 28th) and anytime before the 31st as the deadline for the bonus mini.

So the top picture has the minis I plan on finishing, and the bottom picture has those that I would love to finish in addition.

Other Zeds I'd like to get finished soon
We agreed that part-painted but unfinished minis could be allowed! We also plan to do something similar in other themes in occasional intervals.

I am still aiming to do my Zombies in groups of three tied together by a common colour (see here for a previous example). Let Zomtober commence! Well from tomorrow at any rate...


Monday 24 September 2012

Outhouse/Store Shed (2)

Storehouses with two painting techniques
A second of these by 4Ground, to show the difference between the two painting styles I used.

The old style is on the left, and the newer style technique I tried with the Old West buildings is on the right. I know which technique's results I prefer...

Friday 21 September 2012

Old West Buildings

Building by Sarissa Precision
Okay, been a while since the last update, and this week has seen some frantic painting and modelling. Rob conceived a basic idea for Hallowe'en Madness II, and that immediately kicked me into gear building all sorts of Old West what-nots that I had acquired in recent weeks.

Of those, these buildings were quickly painted using thinned down paints straight onto the laser-cut MDF.

Building by Sarissa Precision
I had planned to undercoat them and paint them up from there, but i then ran with an idea I saw on Lead Adventure Forum, and so settled for painting straight on. With the way the MDF soaks up the paint, it left me with a natural variation of colour that I felt was suitable for the types of building I am representing.

I then picked out some individual planks to paint with a thicker paint to break up the uniformity further. The buildings will eventually have some signage (measure are at hand in that regard!).

Building by Battle-flag
The two apex roofs were part of the kits as bought, while the flat roof had some scrunched up paper stuck on with thinned-down PVA, and a coffee stirrer cut into two halves length-ways and trimmed to fit.

While I was building these, I also tackled some wagons and a gallows, which are all near to finished and so should be posted soon. Or at least soon-ish.

Sunday 12 August 2012

New Gaming Table

Basic table top
I have been planning a semi-permanent table since moving house last year, but inevitably plans fell by the wayside as other priorities cropped up.

However, impetus was recently renewed when we (the wife and I) needed to order some building materials from Wickes, and she suggested that if I needed any stuff for my planned gaming table it would make sense to order it at the same time. I did not need to be asked twice.

36" x 32" battle-mat
The problem was always going to be a combination of limited access size to the attic, and my limitations as a crafts-person.  Seeing what the limits were I settled on assembling a 4' by 4' table top onto which I could lay battle-mats to represent grasslands; urban; sand/desert/dusty western town.

I had a spare bedside cabinet from the move last year, and picked up 3 more to form the 'legs' for the table top (they were on offer, saving me money I had not expected to save - talk about serendipity!). So a few nights ago I spent 2-3 hours assembling the 3 new cabinets, then today a couple of hours assembling the table top.

GW Battlemat
As you can see from the top picture the table is untextured; my plan is to simply lay on top what ever I need when ever I need it. the cabinets double up as terrain storage areas, complete with labels to make finding stuff easier. I have some terrain modules from Ziterdes that I plan on making into a nightmarish alien/other-dimensional landscape.

Not the biggest table in the world, but sufficient for my needs, and it means I can look at some home Anima Tactics, 7TV and Warmachine/Hordes gaming among other things. I may even dig out some of my old WH40K armies too!

So there should be now time and motivations to get some more minis painted.

Thursday 28 June 2012

Outhouse/Store Shed (Painted)


This is the 4Ground Outhouse/Store Shed I picked up and blogged about recently.

Assembly took around 25 minutes (see post here) and painting was also quick and easy.

As mentioned previously, the footprint is 4 inches by 2 3/4 inches and the building has a height of 2 inches sloping down to 1 1/2 inches.

The building was painted with and Army Painter spray Leather Brown base coat. Some by-hand touch up followed (also Army Painter Leather Brown), and then some dry-brushing with Stone Grey (Vallejo)  mixed with Leather Brown. I picked out some particular planks with Stone Grey to provide colour variation.

Wednesday 27 June 2012

Hobby Stuff - Tablescape Trees

I love these trees from Tablescape, I really do. They don't shed flock like the traditional wire and flock gaming trees, and can survive being knocked over etc.

Added to that, they come pre-painted and I think they are simply marvellous. Of course tastes differ, but I wanted to draw attention to them for anyone who may be interested.

The trees are made of hard foam and are £3 per tree, or 5 for £14 at current prices. Tablescape offer two base sizes which can be seen in the picture. The bases come separately (but are included in the price) and simply screw into pre-made holes.

Hobby Tip 1
The underside of the 'foliage' is in the hard foam colour; simply paint it with some acrylic - 5 trees can be done in a matter of minutes. I use Vallejo Black Green for the two darker colours, and Vallejo Medium Olive for the more olive coloured trees.

Hobby Tip 2
The two base sizes effectively give two primary variations of height among the trees. More variation can be added by cutting down the trees. The underside of the 'canopy'/'foliage' is flat, and what I did was take off 0.5 to 1 cm on a handful of trees. As can be seen this allows for an increased variation of heights very easily, especially if you don't want mix the different base styles.

The cutting was done with a coping (or fret?) saw in some cases and a bread knife in others. The coping saw made for easier cutting. I then sealed the undersides with a thin coat of liquid green stuff before painting as above.

The trees (in picture above):
1. Normal uncut height, tall base
2. Cut down height, tall base
3. Uncut height, short base
4. Cut down height, short base

Thursday 21 June 2012

Looking For: Lots Of Dark Grey Acrylic Paint


Okay, I am after a lot of the same colour water based acrylic in a dark grey (think German Grey or Black Grey by Vallejo as an example); I need to paint circa 24 square feet of terrain, and so mixing is simply not an option since I may need to colour match at a later date.

I looked at docrafts Artiste paint which I like and is cheap, but they do not appear to do a dark enough grey (basically a not-far-from black kind of grey).

What I am looking for is:
1. paint in the right colour
2. available from a UK supplier
3. a consistency comparable to GW or Vallejo or similar (not thick and very viscous as some art suppliers paints)
4. not exorbitant in terms of cost.

If anyone can point me in the right direction I would appreciate it (an hour of google fu failed me this afternoon); feel free to comment below. Thanks in advance.

On other stuff, I hope to do a couple or so terrain posts soon, so watch this space.

Tuesday 22 May 2012

4GROUND Laser Cut Wooden Outhouse/Storeshed

I picked this up recently at my local games shop (hello to Wayland's Forge), mainly on a whim, but with thoughts I could use it for a number of settings: pulp; contemporary (a rickety old storehouse on an industrial site or an abandoned shed somewhere); western; Victoriana; Weird World War II/AE-WWII. Obviously the VBCW guys could make use of it I reckon.

This is the first laser cut kit I have firmly assembled (dry-fitting with my Sarissa Precision City Block stuff has not led to full assembly of those yet...), and I thought I would just do a brief post.


The kit if from 4GROUND, who do a number of kits in what is the growing laser-cut terrain market. At £6 GBP I was happy with the price and so I decided to pick it up and see if I was happy with the product.

Well I like what I have so far, but the truth will be in painting it ultimately. in the mean-time here are my thoughts.

Build Time
It took me 15 minutes to cut, clean and assemble the basic frame up to the wall, but excluding the doors.

I then allowed some drying time to do other stuff, and finished it off with 10 minutes more work. So 25 minutes cutting, building and gluing spent on this, but with a break.

Not too bad, and I am sure it could be done a lot quicker by more experienced laser cut kit modellers. no time to get frustrated as I can by anything requiring a lot of effort (GW terrain kits - I am looking at you).

Value For Money
It is a nice simple kit but has etched detail to differentiate different planks of timber; has wear and tear cut-outs and the larger of these are optional. the roof can be removable depending on gluing preferences as can the door.

At £6 for a building with a lot of potential utility I am very happy with the price.

Utility
As noted I can see this being used in a variety of settings - a 'good thing'. It has a footprint of 4 inches by 2 3/4 inches and a height of 2 inches sloping down to 1 1/2 inches.

In game terms pretty useful for blocking terrain and for many games with 4-6 move rates perfect for nipping around in a single move to get out of sight but not much further.

Overall
I like the kit and will very probably buy more 4GROUND stuff. Definitely recommended.

Sunday 22 April 2012

Salute 2012

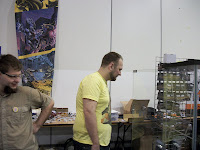
Maciej (l) and Karel (r) at Pulp Monsters
I enjoyed Salute 2012 immensely, attending with main gaming buddy Rob (his blog is here). As is usual for us we travelled down by train, and as usual I mused whether I had planned the journey well enough to avoid being at the end of the queue. While in the queue Rob found a winning 'golden ticket' for KR Multicases which he later handed in a for a marvellous bag. Very cool. Into the hall and my first stop was Pulp Monsters stand for my favourite game (Pulp City). On show there were some sneak peeks of new stuff (which I blogged about here).

At the Pulp Monsters stand I finally got to meet with Hendybadger, (of the Tales of a Tabletop Skirmisher blog here), along with Mrs. Badger and the very mellow Baby Badger (replete in pirate outfit - Hendybadger is nothing if not consistent!). It was great meeting Hendybadger at last, and I reecieved two very kind gifts from the Badger's - a cake baked by Mrs Badger (thanks!) and a lovely mini which will be painted and shown on the Pulp Citizen blog very soon!). It was great to meet you guys.


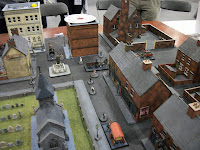
Empire of the Dead demo board
My next stop was West Wind's stand to buy a copy of Empire of the Dead which came with a bonus free miniature - result! The rest of the day I was wandering around with Rob, chatting to Maciej, shopping a little, taking mostly blurry and useless pictures, shopping a little more, and generally enjoying myself. The shopping list included: Some paints - Empire of the Dead book
- Pulp City (Night Fright) spare that I want for a specific reason - Some hills from Kallstra (like them a lot
- I will be buying more in the future) - Power Generator hard-foam piece from Micro Arts
- Wolsung mini
- Maximilian(?) mini from Gringos 40's
- Not-Daphne toting mini-gun from Hasslefree
- Zombie-Elvis-Halfling from Heresy
- Some Cobalt aliens from Black Hat
- Some tree bases from Tablescape (look for a hobby tip post soon on these and their trees).

So it was mainly bits and bobs from various manufactuers.
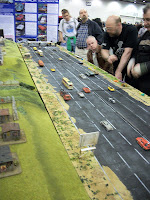

7TV board
A number of boards caught my eye. My pick of the bunch was the Crooked Dice 7TV main display board.

I wish my better pictures were the ones covering more of the board, but alas not. The board was brilliant and a great advert for 7TV and its ethos, reflecting its heritage from Bond movies and in this case of course from On Her Majesty's Secret Service.

Two more boards especially caught my eye. There were so many good ones, but some stood out.
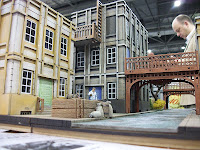
Wolsung board.
Micro Art Studios were previewing their upcoming (Autumn 2012) Wolsung laser-cut terrain across two wonderful boards. Wow. I cannot wait to get hold of some of this.

This terrain is stuff that will be pressed into use for Pulp, Supers/Pulp City, Victoriana, and maybe Zombies gaming when i do get hld of some. It was simply stunning and looks to be truly modular with so much possibility for inter-connection and multi level gaming. As I say, I cannot wait to get hold of some of this stuff.

Scarlet Thunder
Lastly, great mention has to go to the Scarlet Thunder board. I have no idea what was going on with the game, but the board was fantastic, so very worthy of mention. I just wish I have better pictures of all the boards I enjoyed but this is a rough guide to what I got to see, and what I enjoyed.

Thursday 12 April 2012

Red Skull

Okay not in any way a Red Skull mini, just one that conveniently was close enough to paint up as Herr Johann Schmidt. Whew - safely navigated that minefield.

This not-in-any-way-at-all-like the Red Skull is a mini from What The? Now I believe their lines have been taken over by another manufacturer, so may still be available.

This one got started as an afterthought when painting another mini, Sgt. Bale Extreme (on Pulp Citizen), mainly to pass time while paint dried on Bale.

I decided this week to at least clear a couple of minis so this and the previous Boss Zombie fitted the bill and voila - one super-baddie that can be used for supers, Weird War II and probably other stuff as well (pulp maybe?).